
Xsell: promote one brand on another
Published Updated
Xsell puts an advert for one of your brands in front of the members of another. You build a short offer page for the brand you want to grow, then run a campaign that shows a banner for it inside the activity feed of your other brands. A member who taps the banner lands on your offer page, pays once, and gets a profile on the promoted brand carrying over the details they already gave you. Everything happens inside the portal, and every click, registration and pound is reported back to you.
Been here before? The Changelog lists what has changed in this guide since your last visit.
The screenshots in this guide were taken from a demo brand. The portal is improved regularly, so some screens may look a little different from what you see today. Where the wording differs, trust the labels on your screen.
How Xsell works
There are two pieces, and they are built in two different places in the portal.
- An Xsell page is the offer page members land on. You create it on the brand you want to promote, under that brand's Xsell Pages tab.
- An Xsell campaign decides where that page is advertised, who sees the advert, and for how long. Campaigns live under Pro Tools → Xsell Campaigns.
You can build one Xsell page and reuse it across several campaigns, or build a few pages and test them against each other.
- Open the brand you want to send members to and create an Xsell page for it.
- Edit the page: copy, colours, images, and the call to action.
- Preview it with View to see what members will get.
- Create a campaign from that page, choosing which of your other brands the advert runs on and who it targets.
- Watch the results on the Reports tab, and deactivate the campaign when you are done.
Step 1: Create your Xsell page
Go to My Brands, open the brand you want to promote, and choose the Xsell Pages tab. This tab is separate from your normal Pages: Xsell pages do not appear in your site hierarchy, your menus or your sitemap, so they will not show up in your ordinary page list.
Click Create.
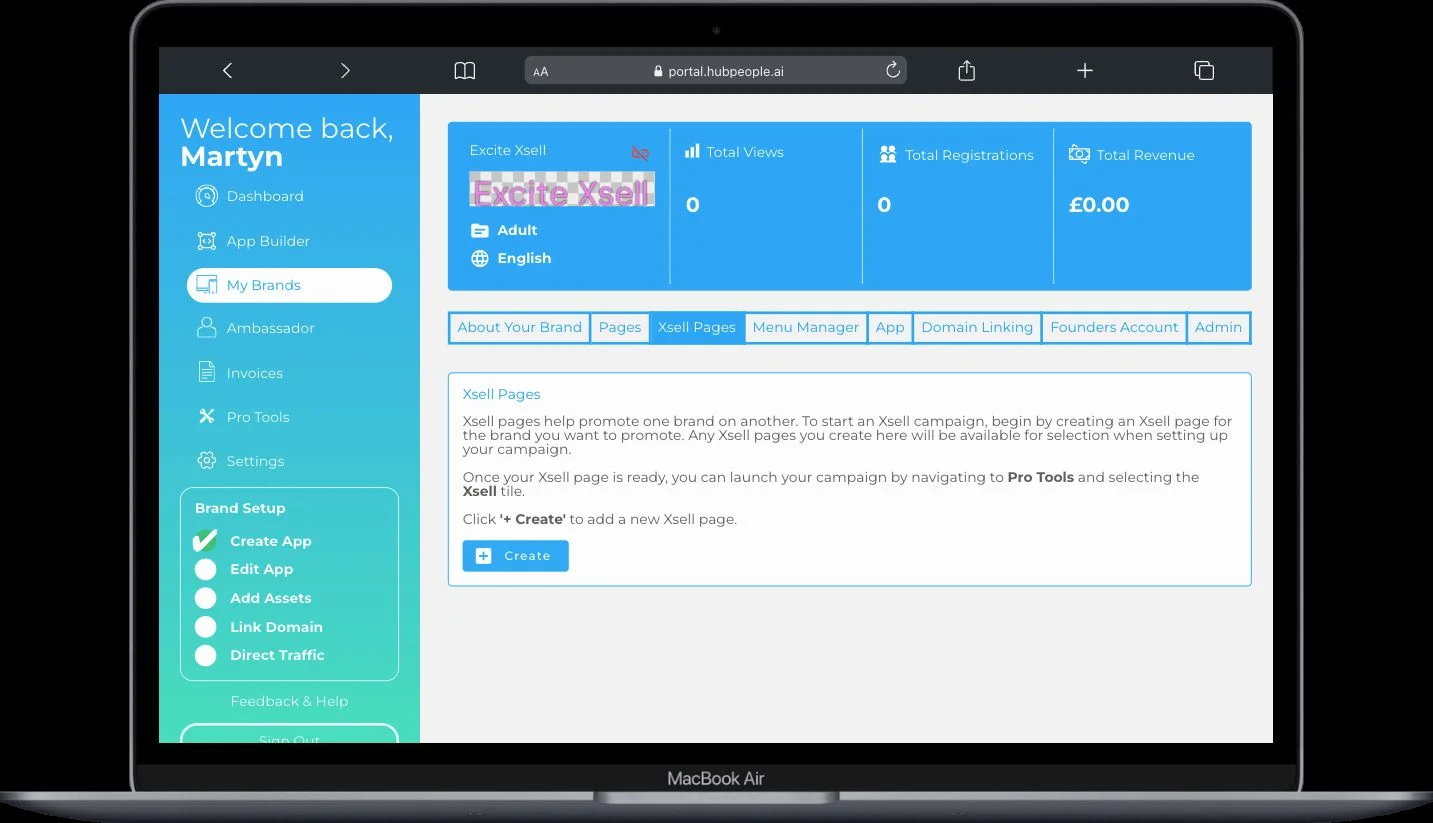
You are asked for a page name. Two things to know about it:
- It is how you will recognise the page in the campaign builder later, so make it descriptive:
vip-pass-7dayreads better thannewpage. - It is also used as the page's address, so spaces are not allowed. Use hyphens or underscores instead, and do not include a
/. Members never see this name.
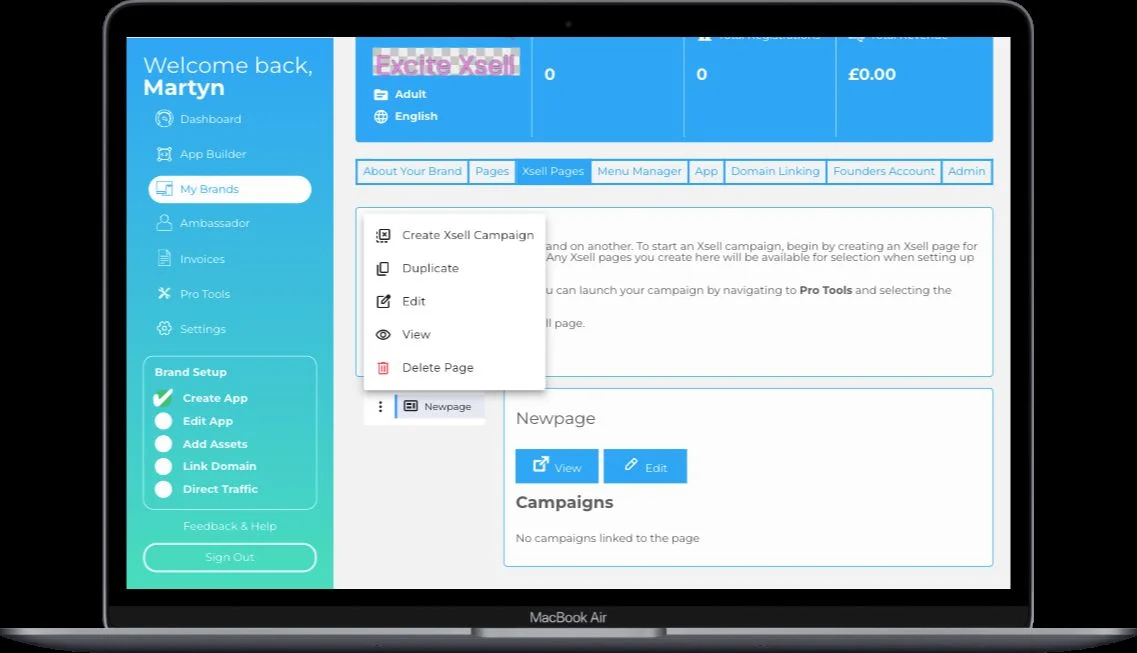
Click Create and the page appears in the list on the left, with a panel on the right showing View, Edit, and any campaigns linked to it.
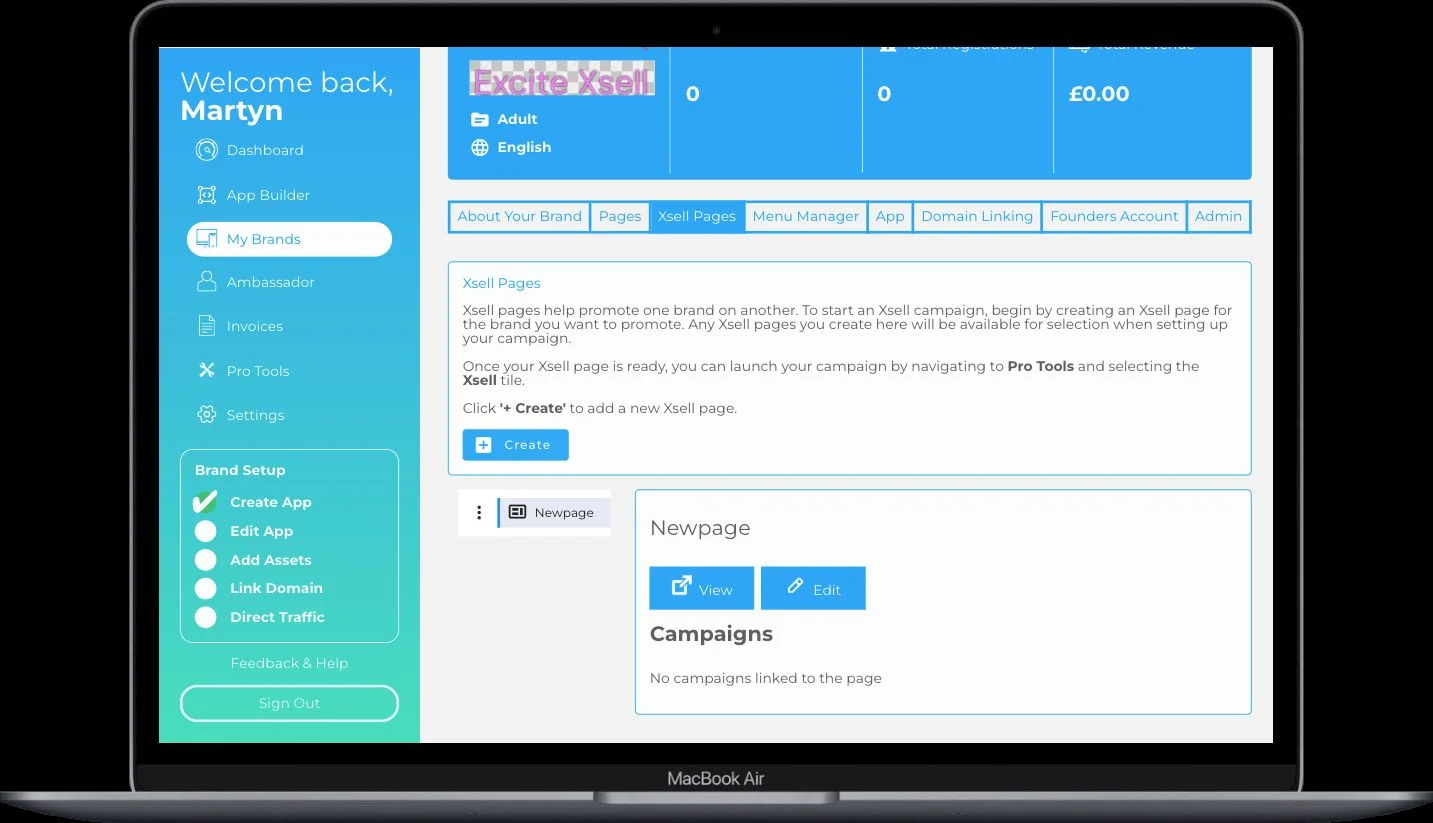
Step 2: Edit your Xsell page
Click Edit to open the page in the editor. Every editable area is labelled with a small blue tag, and each tag gives you the same set of controls: edit the content, pick from your image library, shuffle in an alternative, or hide the block.
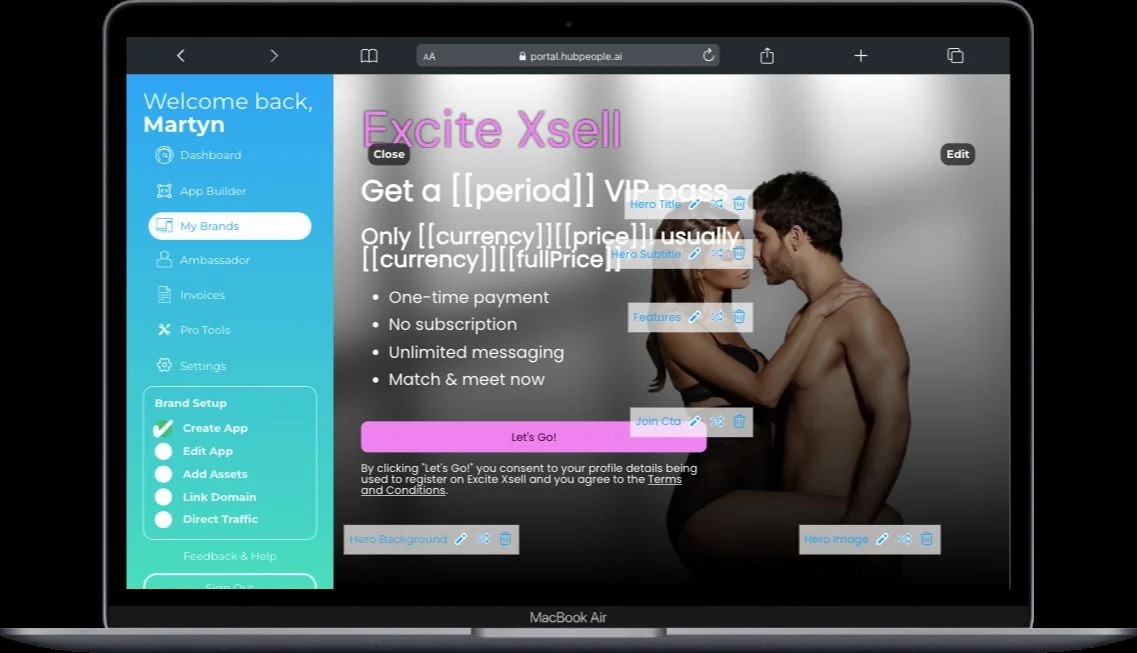
| Area | What it is |
|---|---|
| Hero Title | The main headline, for example the offer itself. |
| Hero Subtitle | The supporting line under it, typically the price. |
| Features | The bulleted list of what the member gets. |
| Join Cta | The wording on the button. This text is also used in the consent line printed underneath it. |
| Hero Background | The full-bleed background image. It has separate mobile, tablet and desktop versions so it stays sharp on every screen. |
| Hero Image | The foreground image sitting over the background. |
Colours follow the brand's colour scheme, so the page picks up your primary colour on the button without you setting it. The logo at the top comes from the brand as well.
[[period]], [[price]] and [[fullPrice]] in the title and subtitle. Those are filled in with the real offer values when a member sees the page, which is why the preview carries a yellow "for demonstration purposes only" banner. Leave them in place unless you deliberately want fixed wording. The consent line under the button is written for you and cannot be edited: it names your call to action, the brand the member is registering on, and links to the Terms and Conditions.
When you have finished, click Close. Your changes are saved as you make them.
One template, for now
Xsell currently ships a single page template and a single offer type, so every Xsell page starts from the same layout. What makes yours different is the copy, the images and the colours.
Step 3: Preview your page
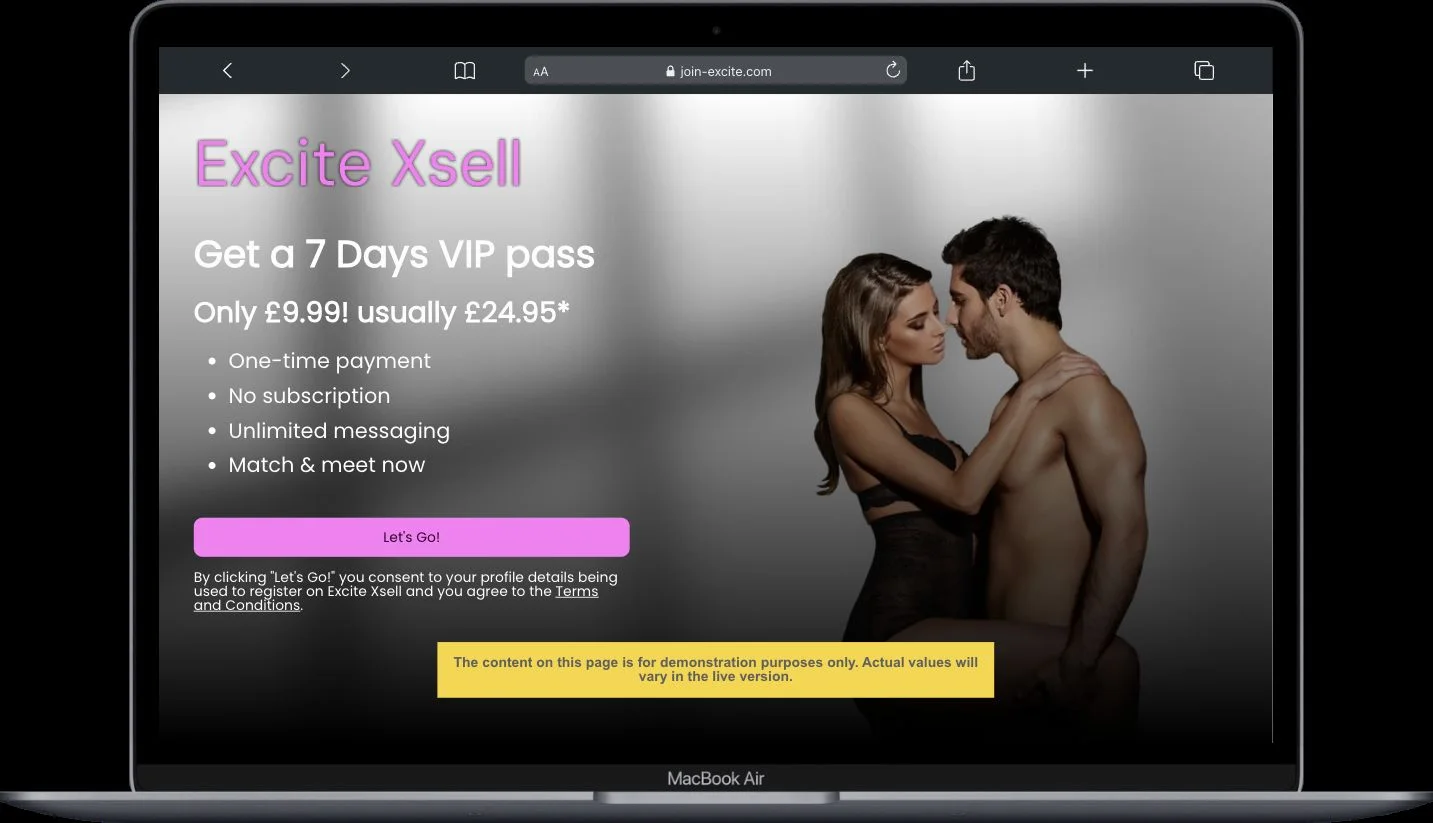
Click View to open the page exactly as a member will see it, on your brand's own address. This is the check worth doing before you spend anything on a campaign: read the headline on a phone-width window, make sure the button wording matches the offer, and confirm the background image has not cropped somebody's head off.
Step 4: Create your campaign
Once the page reads well, turn it into a campaign. The quickest route is from the page itself: click the three dots next to the Xsell page and choose Create Xsell Campaign. That carries the brand and page through for you.
You can also start from scratch at Pro Tools → Xsell Campaigns → New Campaign.
What you are promoting
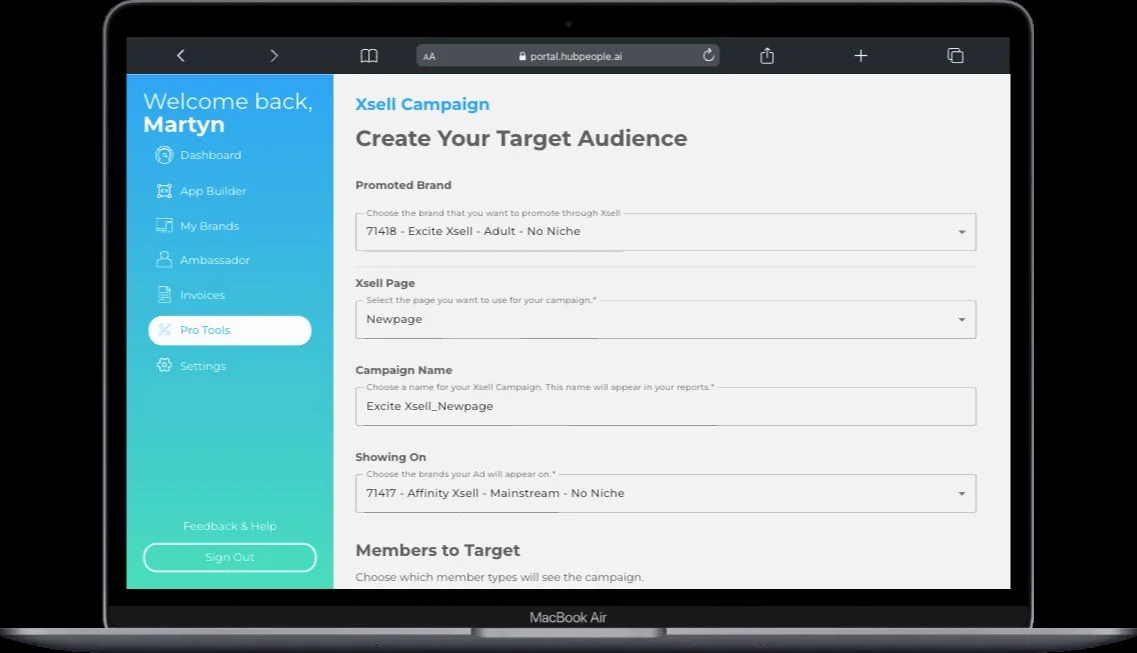
The top of the form sets the offer.
- Promoted Brand. The brand you are sending members to. If Global Brands are available to you, you first choose between one of your brands and a Global Brand, then pick from that list. Global Brands are promotional brands built by HubPeople that any partner can cross-sell to; revenue from them is shared according to your partner agreement.
- Xsell Page. The page you just built. If the brand has no Xsell pages yet, the form says so and offers you a link to go and create one. Once a page is selected, a View Page button appears so you can double-check it without leaving the form.
- Campaign Name. This fills in for you as the promoted brand plus the page name, for example Console Comrades_Upsell. It is the name you will see in your reports, so if you plan to run more than one campaign from the same page, change it to something that says what you are testing, for example the offer plus the audience.
- Showing On. The brands the advert runs on. You can pick several. The promoted brand itself is excluded from this list, since there is no point advertising a brand to people already on it.
Who sees it
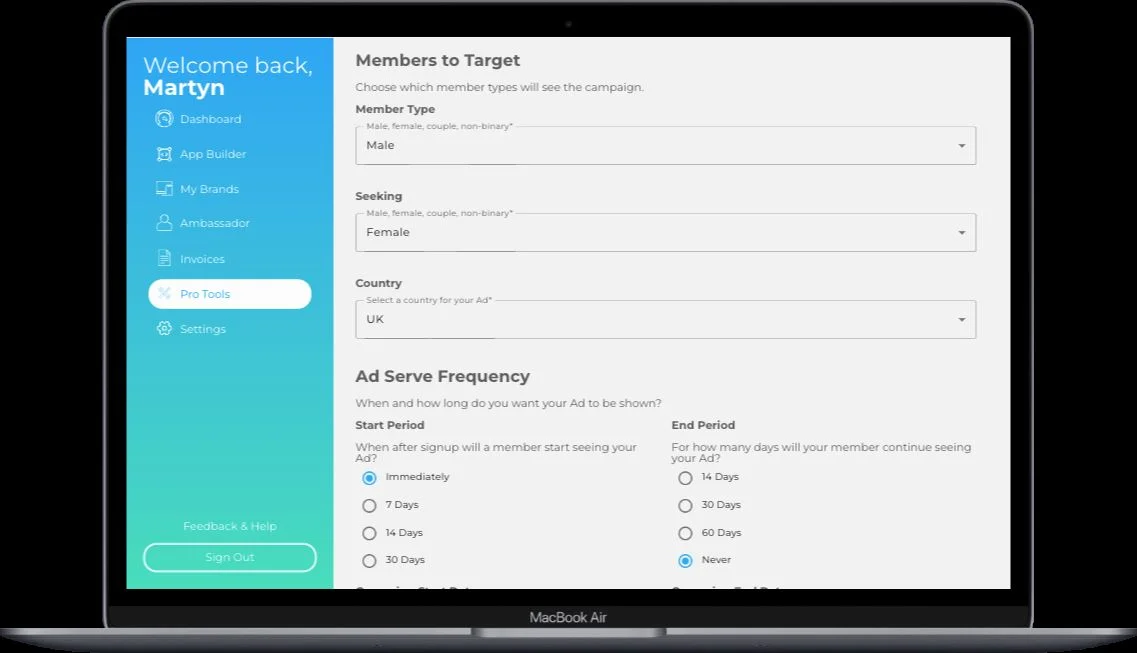
The Members to Target section narrows the audience. Every filter accepts more than one value, and leaving a filter wide means you are not narrowing on it.
| Filter | What it does |
|---|---|
| Member Type | What the member is: male, female, couple, non-binary. |
| Seeking | What they are looking for, using the same set of options. |
| Country | Where they are. Common markets are listed first, and there is an All option to select every country at once. |
| Premium Status | Classic or VIP members. Useful when your offer only makes sense to one or the other. |
| Verification | Verified or not verified members. |
When it runs, and for how long
Ad Serve Settings controls the member's own timeline, and the campaign dates control the campaign as a whole.
- Start Period. How soon after a member signs up they begin seeing your advert: immediately, or after 7, 14 or 30 days. Delaying it lets a new member settle into the brand they joined before you offer them another one.
- End Period. How long the advert keeps showing to that member: 14, 30 or 60 days, or Forever for no per-member cut-off.
- Campaign Start Date and Campaign End Date. The window the campaign itself runs. The end date is what stops new members being added to the campaign. Dates are entered as MM/DD/YYYY.
The banner image
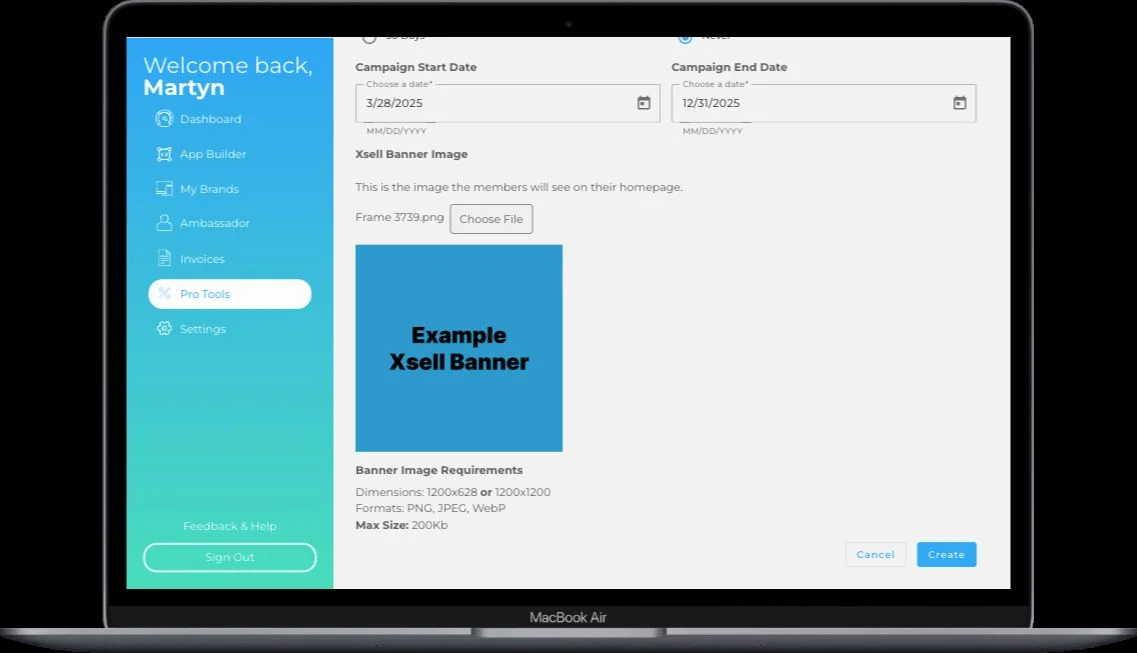
Last comes the Xsell Banner Image: the advert itself, as it appears in the member's feed. This is the only creative the member sees before they click, so it does most of the work.
The requirements are strict and the form will refuse anything outside them:
- Dimensions: 1200 x 628, or 1200 x 1200.
- Formats: PNG, JPEG or WebP.
- Maximum size: 200 Kb.
A preview of your upload appears under the file picker so you can see what you have chosen. When everything is filled in, click Create.
Step 5: Check the campaign is running
Creating the campaign takes you to its Campaign Summary, which is the single page to come back to for one campaign. It shows the status, the promoted brand, the brands it is showing on, everything you chose under targeting and frequency, and the banner you uploaded.
The Showing On section is worth a second look: it breaks the results down per brand, with ad clicks, registrations, upgrades and your share of the revenue for each. That tells you not just whether the campaign works, but which of your brands is actually supplying the members.
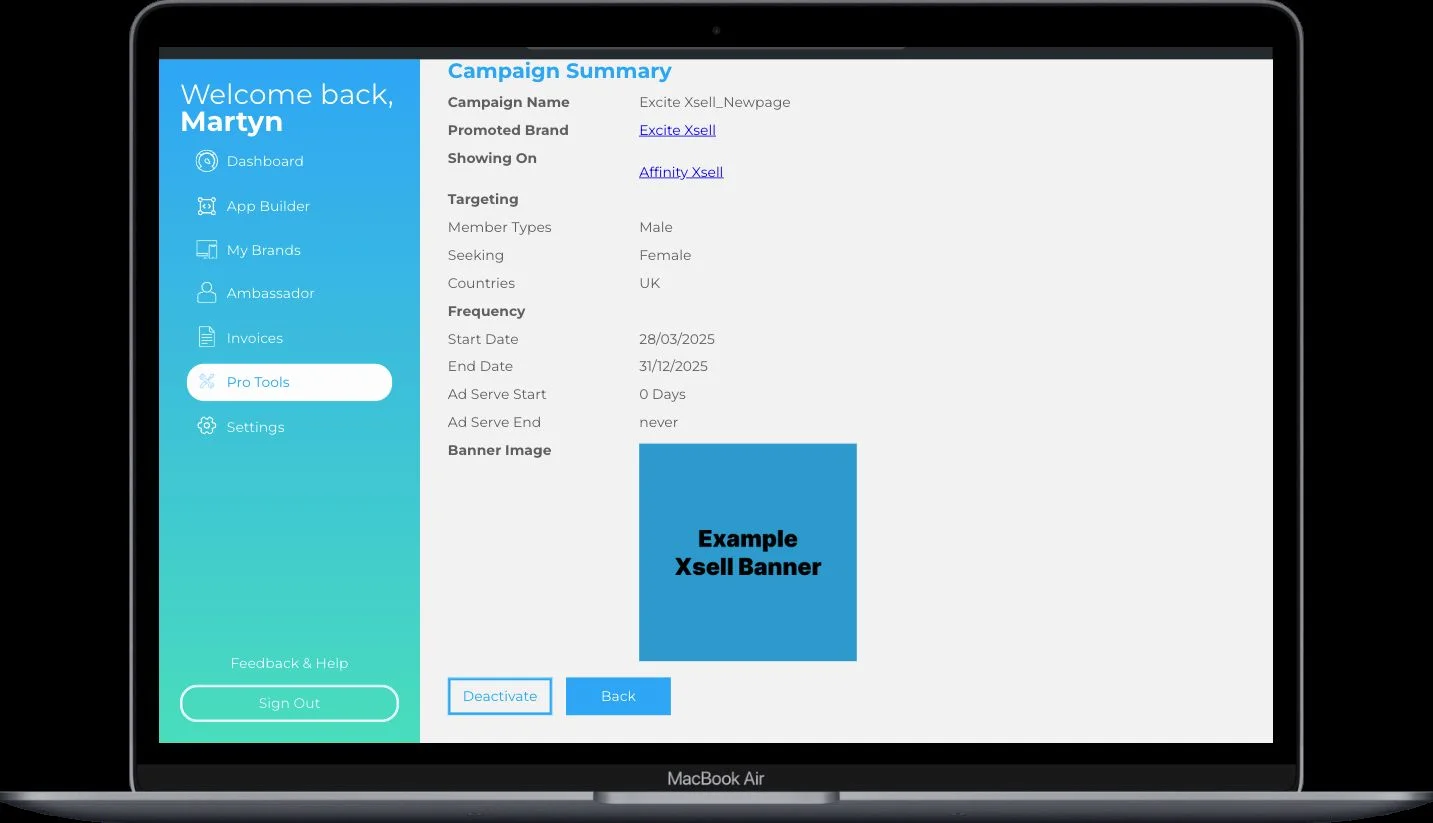
To stop a campaign, click Deactivate here. A campaign's settings cannot be edited after it is created, so if you want to change the audience or the timing, deactivate this one and create a new campaign with the settings you want. You can reuse the same Xsell page.
Track how it is performing
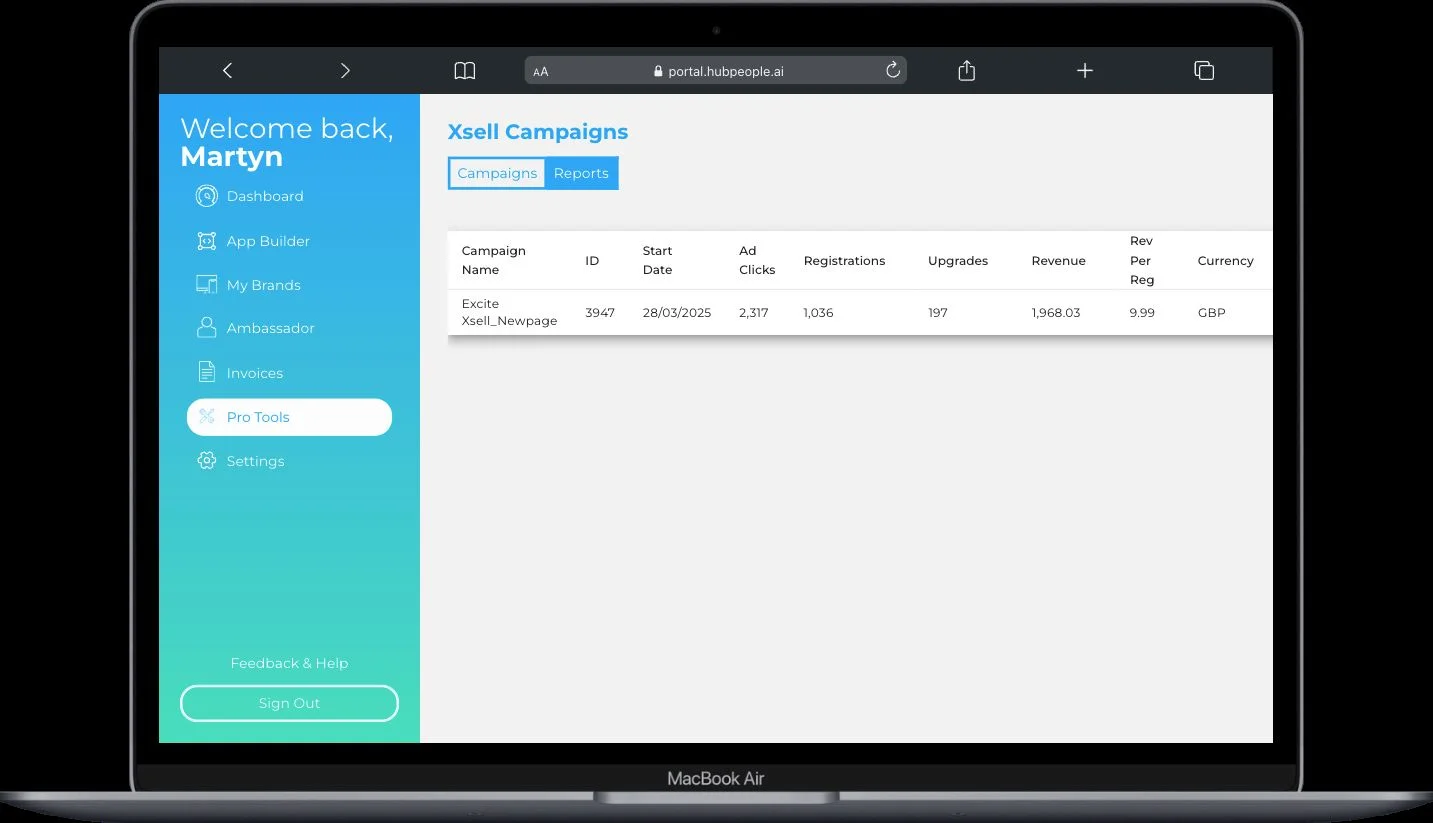
Go to Pro Tools → Xsell Campaigns for everything at once. There are two tabs.
The Campaigns tab
Your campaigns as a list, with the ID, name, created date, whether it uses a Global Brand, the promoted site, the brands it is showing on, who it is showing to, and its start and end dates. The links take you straight to the brands and the Xsell page, and View in the Actions column opens the Campaign Summary. Column headings sort the table, which is the quickest way to line up several campaigns.
The Reports tab
The numbers. One row per campaign, covering:
| Column | What it counts |
|---|---|
| Ad Clicks | How many members tapped the banner in the feed. |
| Registrations | How many of those went on to join the promoted brand. Joining through Xsell means paying, so every registration here is a paid one. |
| Upgrades | Paid upgrades taken by those members. Because the Xsell offer is itself a paid pass, do not read this as "registrations that later converted": the money is already counted in Revenue. |
| Revenue and Currency | What the campaign has brought in. |
| Rev Per Reg | Revenue divided by registrations: the number to compare campaigns on. |
| Status | Active or Inactive. |

What your members see
From the member's side it is three taps.
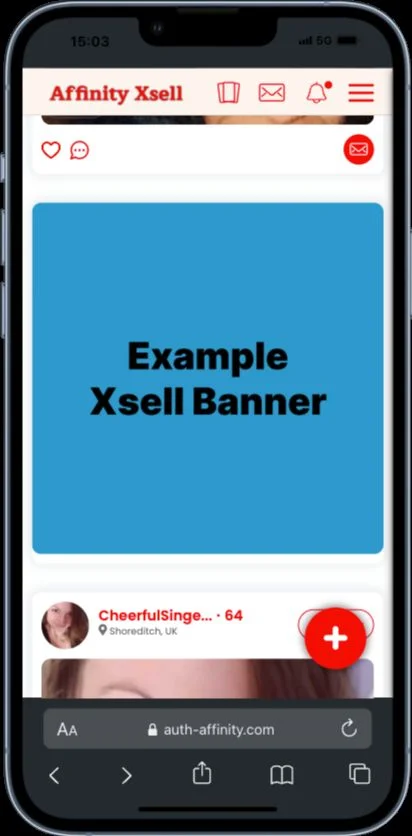
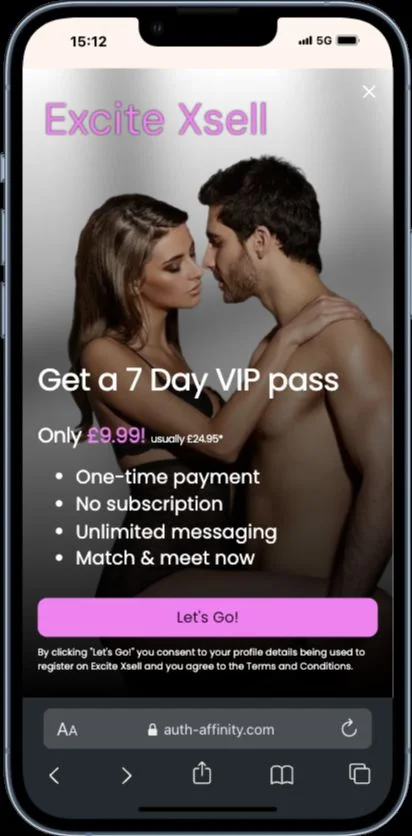
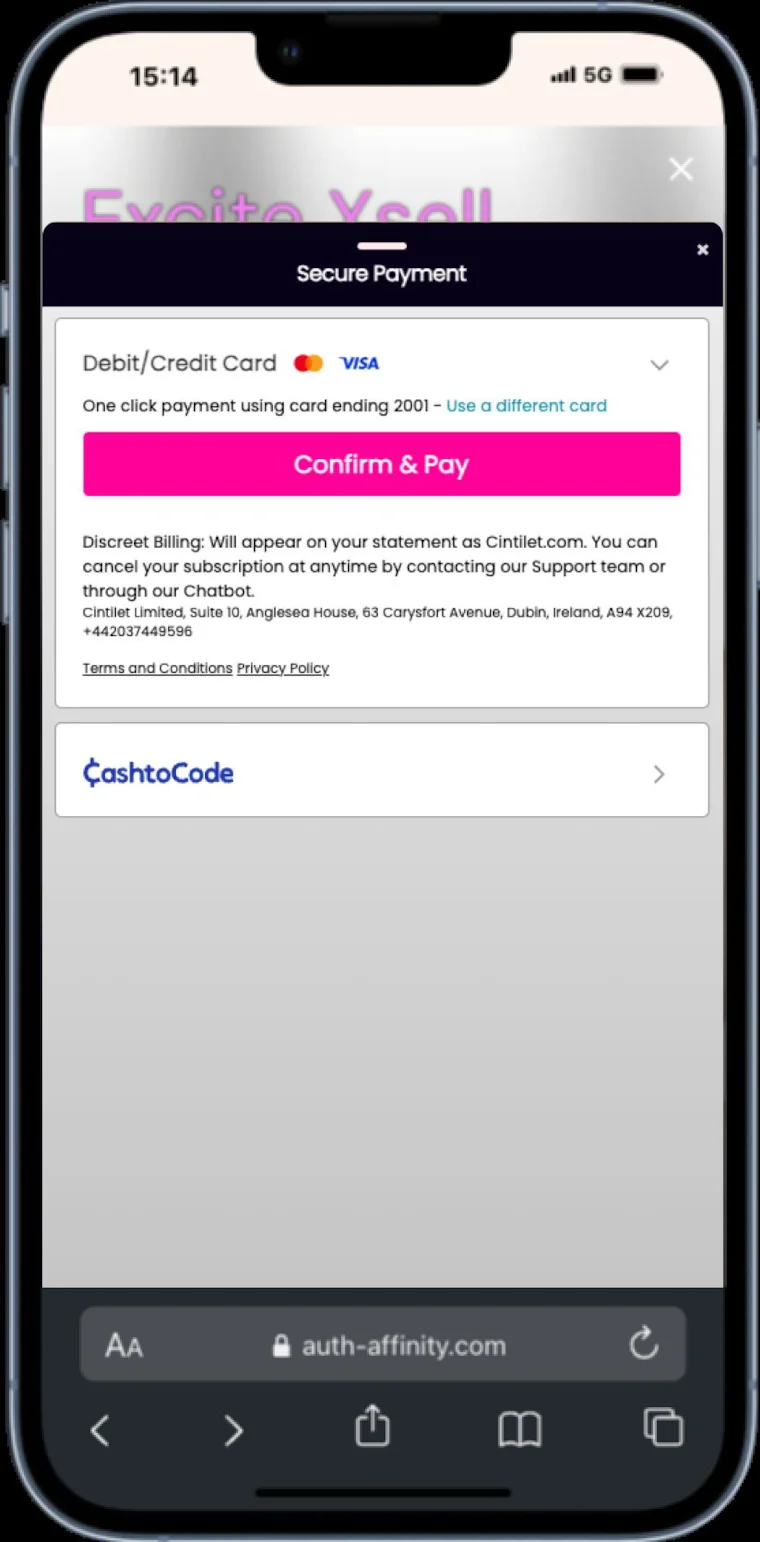
The payment is a one-time charge, not a subscription. Once it goes through, a profile is created for them on the promoted brand carrying across the same details they gave on the brand they came from, so there is no second sign-up form to abandon. That is the reason Xsell converts better than sending members to a cold landing page.
Managing your Xsell pages
The three-dots menu next to each Xsell page gives you the housekeeping options.
- Duplicate copies the page, which is the easy way to test a second headline or a different image against the first.
- Rename changes the page name.
- Edit and View do the same as the buttons on the panel.
- Delete Page removes it.
Because Xsell pages are kept out of your site hierarchy, they are also kept out of your menus and your sitemap, and the page tools you use elsewhere (forcing a page update, applying settings from an existing page, moving a page to a new path) do not apply to them.
A short checklist before you launch
- Did you build the Xsell page on the brand you want to grow?
- Have you opened View and read the page as a member would, at phone width?
- Does the banner match what the offer page actually says?
- Is the banner 1200 x 628 or 1200 x 1200, and under 200 Kb?
- Is the campaign name something you will still understand in three months, when it is one row among twenty?
- Have you set a campaign end date, or do you intend this one to run open-ended?
For a wider tour of the brand tabs that Xsell Pages sits among, see Introduction to your brand →
Changelog
| Release | Changes |
|---|---|
| 11 August 2026 | Corrected the Reports table. Joining a promoted brand through Xsell requires payment, so a registration is always a paid join. The previous wording described Registrations and Upgrades as a free sign-up followed by an optional upgrade, which is not how the Xsell flow works. Also noted that the Campaign Name is filled in for you from the promoted brand and page name. |
| 7 August 2026 | Guide first published on the Help Centre. Covers Xsell as it stands today, including the parts added since the feature launched: Global Brands as a promoted brand, the Premium Status and Verification audience filters, the per-brand results breakdown on the campaign summary, the End Period "Forever" option, and the block on deleting an Xsell page that is linked to an active campaign. |