
The toolkit:
setup and first run
One connection to your Claude account, and your assistant can work across every brand in your portfolio, reading pages, building them, and publishing straight back.
This is not the toolkit you download from the portal. There are two, they work in completely different ways, and this guide is only about the newer one.
The toolkit
- Connects once, to your Claude account
- Reaches every brand you can see
- Reads and publishes pages directly
- Nothing to download per brand, nothing to upload
The downloadable toolkit
- A zip you generate per brand in the portal
- One brand per download
- Builds pages into a folder on your machine
- You zip the result and upload it back
hubpeople-toolkit in the Code tab, ask Claude to install the toolkit there, then start a new chat in that same folder. Nothing to move, nothing to find.Click any screenshot to see it full size.
Step 1
Connect your account
The toolkit works through the connection, so this comes first. In Claude’s settings open Connectors, choose Add custom connector, paste the address below and sign in with your usual HubPeople login. If you want the long version, with screenshots and what to do when it stops working, that is Getting connected.
- Remote MCP server URL
https://mcp.hubpeople.ai/mcp- Sign in with
- The HubPeople account you already use. There is no token to create and nothing to paste.
Once, ever. The connection belongs to your Claude account, not to a machine or a folder, so every computer you sign in on already has it.
Step 2
Open the Code tab and pick an empty folder
The toolkit is a folder on your own machine. Make an empty folder called hubpeople-toolkit wherever you keep your work, then open it here. The install puts the files straight into it, so the folder you open now is the one you will always open.
-

A new session in the Code tab starts on No folder. Click it. -
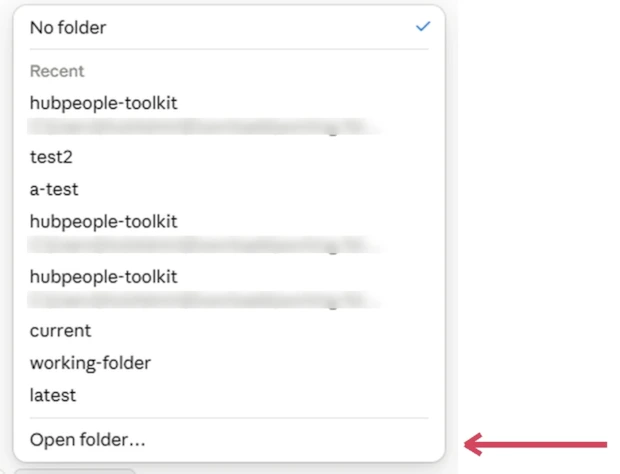
Recent folders, or Open folder… at the bottom to pick a new one. -

Choose your hubpeople-toolkitfolder, then Select Folder. -
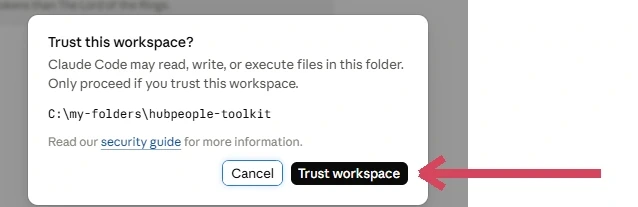
Claude asks before it can read or write in a folder. Trust workspace. -

The button now names your folder. That is what this session can see. -

Once you send the first message it moves up here, beside the session name. Click it to Change directory, show the folder on your computer, or copy its path.
Step 3
Pull the toolkit down
One message does the whole install.
- Start a new chat in the Code tab. Check the chip above the message box names your
hubpeople-toolkitfolder, the one you opened in step 2. - Copy the prompt below, paste it into that chat, and send it.
Set up the HubPeople toolkit in this folder.
Before anything, two checks. Tell me the result of both.
A. The folder. Tell me its full path. If it is a temporary or scratch folder the app made rather than one I picked, stop and tell me to open a real folder first: anything installed in a temporary one disappears when the session ends.
B. Is the toolkit already here? Look for a VERSION file at the top level of this folder. If there is one, do not install anything. Read it, compare it with the newest release at https://api.github.com/repos/Hubpeople-Limited/hubpeople-agentic-toolkit/releases/latest, and tell me which version I have and whether it is the current one. If a newer one exists, offer to upgrade and wait for me to say yes: an upgrade unpacks outside this folder, replaces only the files named in MANIFEST, and must never touch PREFERENCES.md, NOTES.md, brands/ or audits/. If I already have the newest, say so and stop.
Only if there is no VERSION file, install it:
1. Download https://github.com/Hubpeople-Limited/hubpeople-agentic-toolkit/releases/latest/download/hubpeople-toolkit.zip and https://github.com/Hubpeople-Limited/hubpeople-agentic-toolkit/releases/latest/download/SHA256SUMS into this folder. If either address is not found, read https://api.github.com/repos/Hubpeople-Limited/hubpeople-agentic-toolkit/releases/latest instead and download that release's agentic-toolkit-*.zip asset; its SHA256 is in the release notes.
2. Check the zip's SHA256 against the line for hubpeople-toolkit.zip in SHA256SUMS, or against the release notes if you used them; stop and tell me if it does not match.
3. Extract it: the zip holds one top-level folder, so put that folder's contents directly in this folder, with AGENTS.md, VERSION and MANIFEST at the top level.
4. Delete the zip, SHA256SUMS and any empty folder left behind, then list what is here.
5. Sign off warmly and briefly, in this shape: a line saying it looks like I am set up, with a celebration emoji; the VERSION you installed; a line telling me to start a new chat in this folder; then, on its own line, the exact message to paste there: List my HubPeople brands
Do not generate or download a toolkit ZIP from the HubPeople portal; that is the older toolkit and not the one I want. Do not change anything on my HubPeople account; this is setup only.
Claude asks before downloading and before extracting. Say yes to each. When it finishes it tells you the version it installed and that you should start a new chat.
Step 4
Start a new chat in the same folder
Start a fresh session with + New. The files are now in the folder you opened, so there is nothing to switch to.
This is the step people miss, and nothing tells you when you get it wrong.
Claude reads the toolkit’s instructions at the moment a session starts. The session that installed it began before the files existed, so it never sees them. A new chat does.
If a session seems not to know what the toolkit is, ask it: what version of the toolkit is this? A version back means it is loaded.
If it does not know what you mean, the session is on the wrong folder. The folder name sits beside the session name at the top of the window. Click it: the menu that opens has Change directory, so you can point the session at your hubpeople-toolkit folder without starting again. It also has Show in Explorer (Show in Finder on a Mac), Copy path and Open in terminal.
Step 5
The first five prompts
In order, in the same session. None of them change a live site.
Find your feet Changes nothing
Costs nothing and confirms the toolkit actually loaded. If the reply sounds like a general-purpose assistant, you are in the wrong folder, back to step 4.
Hi, what can you help me with here?
See your portfolio Changes nothing
The first time it touches the platform, so this is where it reports what it is connected to. After that report it may add one line saying a newer toolkit exists. Upgrading is your call, whenever you like: how to upgrade.
List my brands.
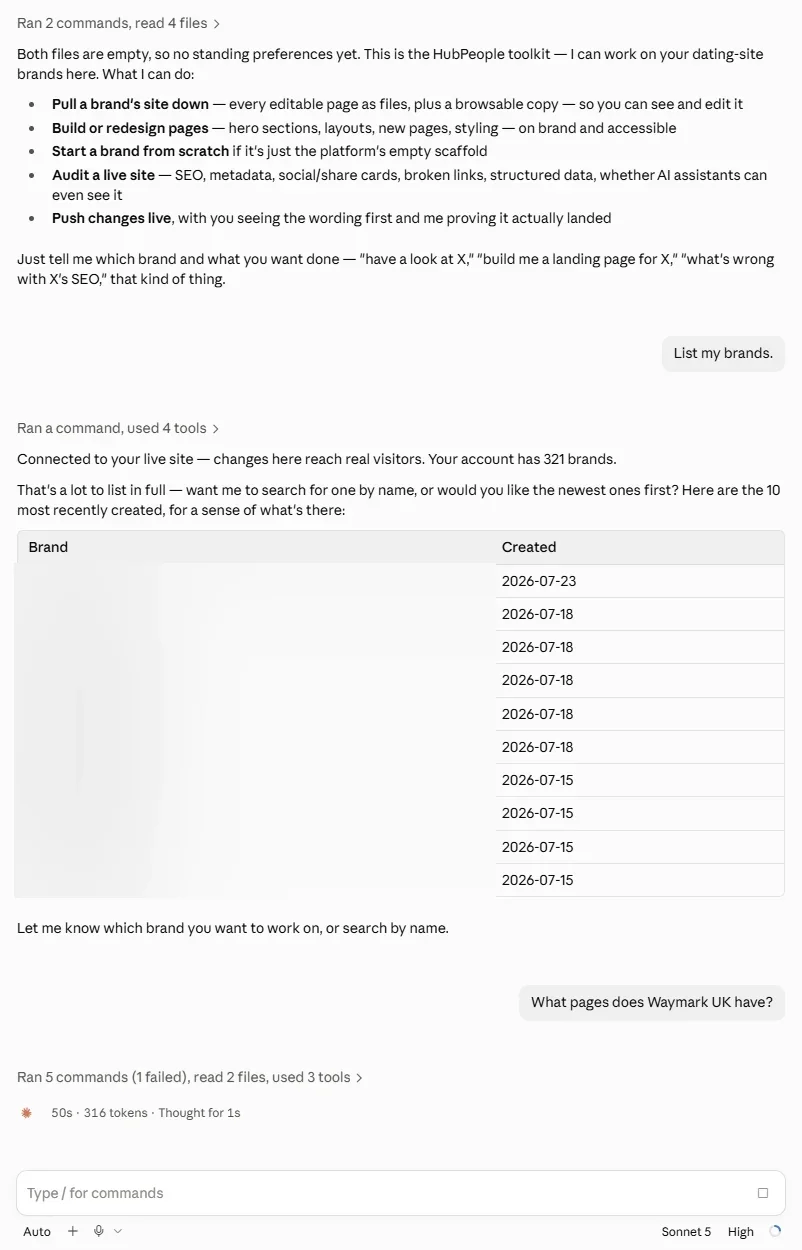
Look at one brand Changes nothing
It says the brand back to you (name and web address) before doing anything with it. Names repeat across a portfolio, so that line is your check that it picked the right one.
What pages does [your brand name] have?
Pull the site down Writes to your machine only
Every editable page arrives as a real file on your computer, with a record of which version each one came from. Your live site is untouched.
Pull it down so I can work on it.
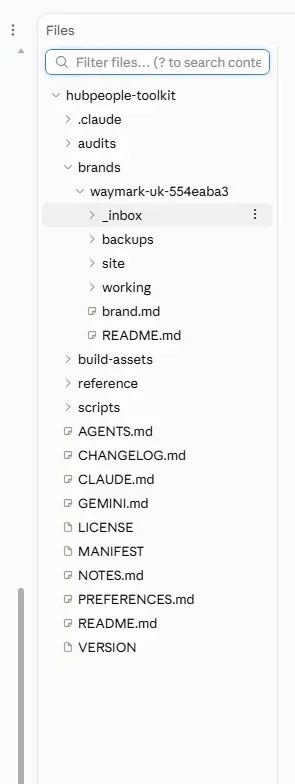
site/ holds your pages, working/ is scratch space, backups/ speaks for itself.Look before you leap Changes nothing
Claude fills in the platform’s placeholders locally first, so you see a real page rather than a page full of tokens, and it opens beside the conversation.
Can I see the site in my browser before I change anything?
Seeing the files
Nothing here is hidden away. The toolkit is a plain folder on your own computer, and everything it does lands in it as ordinary files. Open it in Finder or File Explorer any time you like, exactly as you would any other folder.
It is also the folder you keep coming back to. Your brands, your edits, your backups and the way you have taught the assistant to work all live in it, so opening the same folder next week picks up where you left off.
Without leaving the chat: click the folder name at the top of the window and choose Show in Explorer, or Show in Finder on a Mac. There is also a Files panel inside Claude, under the ⋮ menu, though it does not refresh itself: if it was already open when Claude pulled a site down, close it and open it again rather than concluding the download failed.
More things to ask for
You do not need special wording. Say what you want in plain English and Claude works out which part of the toolkit to use. These are here to show the range, and to give you somewhere to start.
Show the full list of things you can ask for
Not sure where to start
Let it look first, then decide. Nothing here changes anything.
- What can you help me with here?
- Look at [brand] and tell me what you would do first.It reads the pages and comes back with a short list. Pick one.
- What is the quickest improvement on [brand] this afternoon?
- Show me two looks before you build anything.Choosing between two is cheaper than describing one.
Getting your bearings
Nothing here changes anything.
- Which of my brands look unfinished?
- Find me the brands with ‘ground’ in the name.
- What’s on the homepage at the moment?
- Where did you put the files?
Building pages
Built on your machine first, so you see them before anyone else does.
- [Brand] needs a page about [topic]. Build me one.Then: “show me a couple of different looks.”
- Build a pricing page in the same style as the homepage.
- Write me a location page for Manchester.
- This hero is boring. Give me three other openings.
Seeing your work
Always available, and worth doing before anything goes live.
- Show me that page again now you’ve changed it.
- What did you actually change?
- Compare this to what’s live right now.
Menus and structure
Your navigation is managed by the platform, not written into pages.
- What’s in the navigation at the moment?
- Add the new page to the menu.
- Move Pricing before Features.
- Take Safety out of the top nav but leave the page up.
Checking a site over
Reading only, it reports, you decide.
- Is there anything wrong with this site?
- How does this brand look when someone shares it on Facebook?
- Can Google see this page properly?
- Check the whole portfolio and tell me what needs attention.
Teaching it how you work
Remembered for next time, in a file you can read and edit.
- Remember that I always want British spelling.
- From now on, always show me a preview before pushing.
- What do you know about how I work?
Going live Reaches real visitors
It shows you the wording first, then proves the change landed.
- Push it.
- Push the homepage and prove it landed.
- Undo that, put the old version back.
Things it will push back on
Not faults. Ask for these and you should get a question, not an action.
- Add a testimonial from a happy member.It will not invent people or quotes.
- Just push it, don’t bother showing me.You see it first, every time.
- Work on two brands at once.One brand open for editing at a time.
- Change the legal links in the footer.Privacy, terms and the like are managed by the platform. Menu items in the footer are yours to change.
Rough edges
Known, and none of them stop you working.
- The Files panel
- Does not refresh when files appear. Close it and open it again.
- The wrong folder
- Fails silently. Claude behaves normally and knows nothing about the toolkit. Ask it what version of the toolkit this is: a version back means you are in the right place. If not, click the folder name at the top of the window and choose Change directory.
- Security flags
- Claude may refuse to act on instructions it read inside a downloaded file. Leave it be, that refusal is protecting you.
- Other assistants
- Claude is the assistant we support and the only one we have walked end to end. Others that speak MCP should connect with the same address; we have not tested them, and the getting connected page says which are proven.
- Python
- The toolkit's helpers run on Python 3. A Mac already has it; if a Windows machine does not, Claude says so at the first step that needs it, and what to install.