Working with the Agentic Toolkit
The Hubbi Agentic Toolkit lets you build a full, branded website by talking to Claude in plain English. This guide covers everything from downloading the toolkit to getting your finished pages into the portal.
What the toolkit is, and who it is for
The Hubbi Agentic Toolkit is a folder of files you download to your own computer. You open that folder in Claude Co-Work and talk to Claude in plain English: Claude reads the toolkit's built-in instructions and builds your website into the folder's site/ directory. When you are happy, you zip up your site and upload it to the portal, which turns it into live pages.
It is built for partners who want a full, well-structured site (a homepage, articles, member profiles, comparisons, a pricing page, and more) without writing code. You drive by describing what you want; Claude does the building, following the toolkit's rules for layout, links, SEO, and brand style.
site/ folder's contents and upload them in the portal.CLAUDE.md and CLAUDE-reference.md; skills live in .claude/skills/ (read a skill's SKILL.md and follow it); page-type briefs live in .claude/skills/web-page-builder/references/page-types/; built pages go in site/; internal links are extensionless with no trailing slash; never create index.html.Step 1
Download the toolkit
The toolkit is personalised to your brand, so you download it from the portal:
- Go to the portal and open My Brands.
- Open the brand you want to work on.
- Go to the Agentic Toolkit tab, then the Generate Toolkit tab.
- Optionally tick the brand data to include (demographics, polls), then click Generate ZIP to download the toolkit to your computer.
Step 2
Unzip it on your computer
The download is a ZIP. Unzip it before you open it, working from the unzipped folder, not from inside the ZIP.
- Windows: right-click the ZIP, choose Extract All, and pick where to put the folder.
- Mac: double-click the ZIP; a folder appears next to it.
Keep the unzipped folder somewhere easy to find (your Documents or Desktop). You will point Claude Co-Work at this folder in the next step.
A tour of the important files
This is the folder you unzipped in Step 2, the whole thing is what you will open in Claude Co-Work in the next step, not any single folder inside it. You will not touch most of it. Two subfolders matter: build-assets (where you drop your material) and site (where your finished pages appear).
your unzipped toolkit folder/ (the one you open in Co-Work) CLAUDE.md Claude's instructions, leave this alone build-assets/ where you drop your material, see below site/ your finished pages appear here, see below .claude/ skills Claude uses, leave this alone tools/ internal, leave this alone
build-assets itself in Claude Co-Work, since it is the first folder they put files into. Open the parent folder shown above instead, usually named something like Agentic Toolkit <your brand> (12345), the one that contains build-assets and site side by side. If you are not sure which folder you have open, ask Claude "what is in this folder?": it should see build-assets, site, and CLAUDE.md, not just the contents of build-assets on its own.build-assets: where you put your material
Each folder is a place to hand Claude what it needs for a kind of page. Drop your files in the matching folder, then ask Claude to build that page; it reads the folder first.
build-assets/ 0-the-brand/ your brand: name, colours, fonts, logo, founder, notes (set up first) homepage/ homepage copy, hero image or video community/ member and review data (drives the community page and member profiles) article/ article sources (any author) comparisons/ you vs a competitor, one file per competitor features/ features page content and icons pricing/ your plans safety/ trust and safety content poll/ poll data demographics/ optional aggregate stats (no personal data) for trust lines
0-the-brand/. Your brand identity (name, colours, fonts, logo) is the foundation every page is built on, so set it up before building pages.site: where your finished pages go
Claude writes your pages here. This is the folder whose contents you will zip and upload.
site/ global.css your site's single stylesheet img/ your images homepage.html your landing page (there is no index.html) pricing.html pricing articles/ article pages, with articles.html as the landing community/ member profiles, with community.html as the landing comparisons/ comparison pages
{{...}} placeholders for things like your logo and menus. They are not meant to look finished when opened straight from your computer, the portal fills the placeholders and renders them properly once uploaded.Step 3
Open the folder in Claude Co-Work
Most people use the toolkit in the Claude Co-Work desktop app. Open Claude, make sure you are in Co-Work, then point it at your unzipped toolkit folder.
Open the app in Co-Work
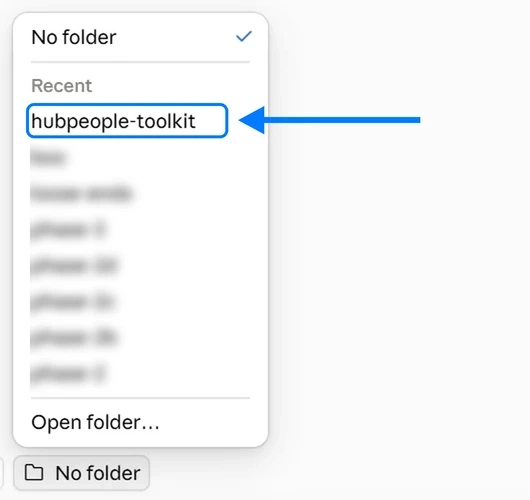
Open the Claude desktop app on its home screen. Make sure you're using Cowork, not Chat, then use the folder control near the message box to add your toolkit folder. Claude updates this screen from time to time, so the exact wording and position can vary a little by version, look for a Chat / Cowork switch and a Project or folder control near the message box; the idea is the same either way.
On some older versions, Cowork is instead a separate toggle at the top of the left sidebar rather than a switch by the message box:
Add your folder, not a project
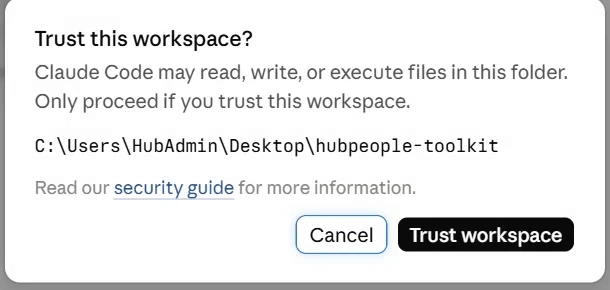
Click the Project or folder control (older versions: Work in a project or folder), then choose Choose a different folder at the bottom of the menu (not Create new project), and pick your unzipped toolkit folder. Adding it as a folder is what lets Claude read your files and build your site directly in it.
build-assets. The folder to choose is the one from Step 2 that contains build-assets, site, and CLAUDE.md side by side, not the build-assets folder on its own, see the file tour above if you're not sure which one that is.
build-assets, site, and CLAUDE.md all together, not just the contents of one subfolder. A good opener is in the next section, you can build one with the Starting Prompt Builder.Step 4
Working with the toolkit: how to converse with Claude
You build your site by talking to Claude. Lead with your goal in plain English and let Claude do the work, it reads the toolkit's instructions and follows them. When Claude offers you a small set of choices, it shows clickable options; you can always type your own answer instead.
What you can ask for (the workflows)
- Guide me through the whole build. Say "build the site" or "guide me through the build" and Claude runs a staged, step-by-step build: brand identity, then the design look, then your menus, then pages, then a site audit, pausing for your approval at each stage.
- Build one page at a time. Ask for any page type ("build an article", "build a member profile"). Claude reads the matching brief and builds it. The Page-type explorer below lists every type.
- Migrate an existing live site. Newer toolkits Say "migrate my site" and Claude crawls your current site and rebuilds it in the toolkit, keeping your page addresses.
- Audit your site. Say "audit the site" and Claude checks for broken links, placeholder gaps, and SEO issues, and offers fixes.
- Upgrade an older toolkit. If you have an older build, say "upgrade my toolkit". Full upgrade guide →
- Check your version. Ask "what version is this?"
Build your opening message
Pick where you are, fill in a couple of details, and copy a ready-to-paste message for Claude.
Starting points, and what to say
Where you start changes your opening message:
- Starting from scratch (a fresh toolkit): begin with your brand. Say "set up the brand", or ask Claude to guide you through the whole build.
- You already have a brand set up (pages exist): ask for what is next ("build a pricing page"), or "audit the site".
- Migrating a live site: say "migrate my site" and give Claude your current web address.
Not sure what to type? Build a ready-to-paste opening message above, or explore the page types below.
Explore the page types
Pick a page type to see what it is, which folder to fill, and what to say.
Step 5
Getting your site into the CMS
What to zip
The easiest way is to let the toolkit package it for you Newer toolkits: ask Claude to "package the site". It writes a zip into the _packages/ folder containing the contents of your site/ folder, ready to upload. On an older build that does not have this, use the manual method below.
If you zip it yourself, zip the contents of site/, not the site/ folder itself. Your homepage.html must sit at the top level of the zip, not inside a site folder. Getting this wrong is the most common mistake, the helper below shows the difference.
Package and upload, without the common mistakes
First, zip the right thing. Put the contents of site/ at the top of the zip, not the site/ folder itself:
Correct: zip the contents
my-upload.zip homepage.html pricing.html global.css articles/ img/
Wrong: zip the folder
my-upload.zip
site/
homepage.html
pricing.html
...On the left, homepage.html is at the top of the zip. On the right it is buried inside a site folder, so every page lands at the wrong address.
Before you upload, check these off
Where to upload
Upload your zip in the portal under Agentic Toolkit → Upload Brand Assets. The uploader validates every file and shows exactly what it will do before you confirm. Full walkthrough:
What the CMS does for you on the way in
When you upload, the portal does work for you automatically:
- SEO fields: it reads each page's title, description, and social preview tags and fills in the page's SEO settings.
- Placeholders: the
{{...}}tokens (your logo, menus, sign-up and legal links) are filled in with your real brand values. - Search data: the structured data (schema) built into your pages is kept, so pages are eligible for rich search results.
- Clean addresses: a file at
pricing.htmlis served at/pricing.
Menus and placeholders: what to ask Claude
Two choices are worth making with Claude as you build:
- Menus: you can have native menus built into each page (they show in preview, but changing them means editing every page), or CMS dynamic menus (managed in the portal, changed without a rebuild, but they do not show in local preview). Tell Claude which you prefer; it will use it site-wide. Deep dive: Menus →
- Logos: the toolkit sizes your logo to fit any shape and sets its prominence for you. Deep dive: Logos →
- Placeholders: ask Claude to use the CMS placeholders for your logo, menus, and legal links rather than hard-coding them, so the portal keeps them in sync across your whole site.